This article is directed towards beginners but I've noticed a lot of more experienced riders which can benefit from a tip or two in this article. So take a look and let me know if anything works for you.
Cycling is a surprisingly complex activity when broken down into parts. At a glance it sounds very simple, you just sit on the thing and push down one leg at a time and the bike will move forward. A bicycle is such an efficient and well designed machine that it will move with even if a low percentage of the force is applied correctly. However, a bad posture and position on the bike can result in wasted energy, bad balance, and injury because of falling or repeated improper movement. If you look at the title picture you'll see a rider going really hard on her bike but with a really low seat, wasting her energy and probably getting bad back pains after relatively short distances.
First let's understand how gravity and movement work on a bike. A rider will distribute his or her weight on the bike in three points of support: the handlebars, pedals, and seat. Seat and handlebars are used for balance and direction (yes, the seat is a main influencer on turning a bike) and the pedals transmit applied force (from shifting weight) to the drivetrain which gets the wheels rolling. The bike's forward motion will be then challenged mainly by friction of it's points of support (bottom of front and back wheel) with the ground and air moving in the opposite direction.
Keeping these factors in mind will help make better sense of the most common mistakes people make when fitting their bike:
GENERAL CONSIDERATIONS REGARDING THE BIKE AND GEAR
1. Bike Frame.
A good deal in the shop or a nice hand-me-down is always very attractive, but there is no use in having a bike which is too big or too small and result in you paying probably more than what you saved in orthopedists and physiotherapy. A rider should always be able to put both feet on the ground on either side of the bike when off the saddle. The right length and height in a bike allow for a comfortable posture and relaxed muscles ready for use and allow a rider to sit comfortably and manage your weight around the points of support. Below is a general guide on bike frame sizes according to height. For a more comprehensive guide, click here.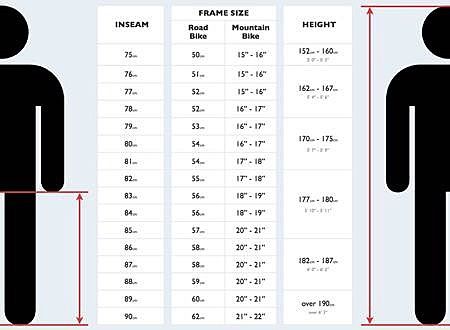
2. Saddle height.
Very important for proper balance, power efficiency, and avoiding injury. Studies have shown that even a 1cm variance vs optimal saddle height will result in significant difference in power when riding. If the seat is too high or low, a rider can get knee and back injuries due to either over extension of muscles and joints or applying force at awkward angles. It is very common for new riders to have a low saddle because it gives a sense of security and balance. To get a ballpark idea of your saddle height, sit on your bike (get someone to hold it in balance for you) and put your heel right in the middle of the pedal. Now extend until you get to the bottom of the stroke (perpendicular to the ground) and lift your saddle until your leg is completely extended while still touching the pedal. Remember that when riding you push with the ball of your foot, not the heel.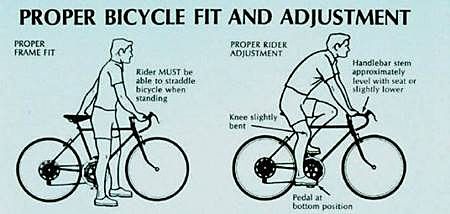
3. Pedals and shoes.
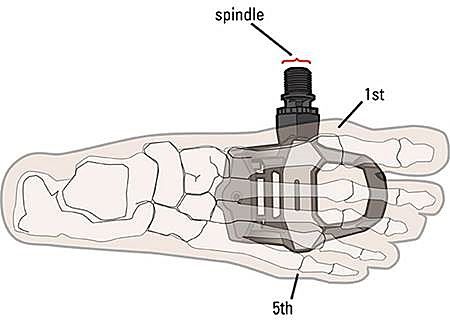
Absolute beginners should consider starting off with regular pedals, progress to installing some straps, and finally graduate to using clips. When using normal pedals and straps, toes must point forward and pedals pushed with the ball of the foot (forefoot in US, midfoot for Europeans). Look at the charts below to know how it should look with either regular shoes/pedals and clips.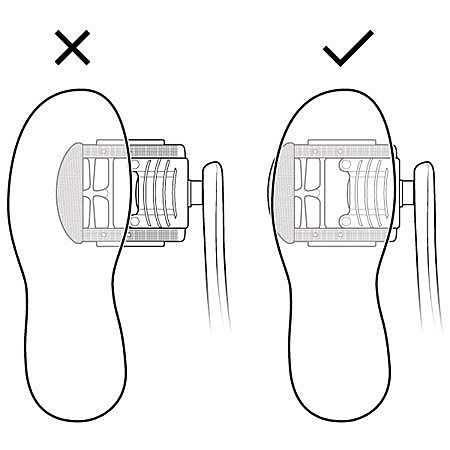
THINGS TO KEEP IN MIND FOR GOOD CYCLING POSTURE
Once the bike is set up, a rider must consider how best use his or her energy on the bike. While many of these problems can be the result of a bad bike fit, some riders will also have bad posture due to being nervous, distracted, tired, or focused on the wrong action. Some of the most common ways to waste energy and get injured on a bike are:
1. Putting too much weight or grabbing too hard on the handlebars.
This comes from trying to control the bike with the hands and not the hips. Truth is that steering a bike from the handlebars makes a bike much more unstable because any minimal movement will be more sudden and pronounced. Putting too much weight or force on the handlebars will also not have any effect in the bike's propulsion and will often result in numb hands and stiff neck or shoulders. Gaining confidence and letting go of the handlebar pressure can be done through simple drills.
Start by focusing on actually relaxing neck, shoulders, and grip. Next, start doing quick drills extending all fingers while keeping both palms on the handle bar. Once that is comfortable, lift on hand at a time while leaving the other on the handlebars, the bike should keep going straight, if it veers off it means there's too much weight on the seat.
For a full list of very good drills to keel "light hands" on the handlebars, click here.
2. Smashing down and not getting feet off pedals.
Easiest way to notice when a rider is not getting the feet off the ground in time is how they bounce on the seat, especially on high cadence. Applying force on the pedal when it is in the bottom dead center only generates a vector which will propel the cyclist upwards and have no effect on the rider. The best way to correct this error is by practicing one leg drills (only works with clips), changing the perception from stomping to either "drawing circles" or shuffling feet back and forth instead of up and down.
3. Keeping elbows locked.
Riders will lock elbows because it requires less effort to sustain weight and makes it easier to apply weight on the handlebars (see point 1). However, keeping locked elbows will transmit any vibration and impact directly to the elbows and shoulders and will result in pain. Correcting this error can be fixed basically by relaxing the elbows and if it is impossible to do, then the handlebars must be raised, no sense in going "super aero" if the rider's body is just not capable of reaching that position. Also, going faster will force a rider to put less weight on the handlebars (as it will concentrate the weight on the pedals instead) and make it easier to relax the elbows.
These are some basic tips on how to get the best out of a bike, but of course every person is different and a custom bike fit will yield optimal results.
Go ride your bike and enjoy!